

Fireworks photography isn't as hard as you might think... but it does require some thought.
Fireworks, who doesn't like them? They've fascinated kids and big kids alike for over two millenia. The first records of them come from China, where various powders (not gunpowder, despite popular belief) were packed into bamboo cuttings and thrown into the fire. This created loud bangs and was reportedly done "to scare off evil spirits"..... (and irritating people with nervous dispositions, no doubt... we all know one of those!)
Fast forward 900 years or so, the invention of gunpowder lead to the creation of more elaborate fireworks closer to what's seen today. Couple that with advances in rudimentary chemistry, mining, paper/cardboard production, safer shipping practices and computer controls, and voila you have the colourful, controllable results you see here!
But you don't have to wait 2000 years to make a good photo! In fact, modern cameras not only make this much easier, but they may even have a dedicated fireworks mode which takes a lot of the guesswork out.
However, I'm going to discuss using essential equipment, then discuss photographing fireworks using manual, shutter/time priority, and bulb modes. Then compare/contrast them so you can pick which one suits your needs.
Gearing up for a fireworks shoot:
This might sound weird, but it shocks many new photographers that you absolutely do NOT need a flash for firework photography. In fact, unless you're putting something within a few metres of the camera (say a person) ditch the flash idea entirely because it'll ruin your shot.
The fireworks, when exploding, are literally on fire, and anyone who has seen a burning candle before, knows that candle flames provide their own light. Fireworks are just like that, only shorter-lived and much more colourful.
There are a few things you need to make your firework photography work much easier:
- A camera that allows a hefty degree of control. Mobile phones are not a good case for this, but they are getting better.... if you can stand the AI adapted, colour corrected, sometimes overtly AI generated (as in, it never looked like that) results.
- A tripod. Fireworks often need a long exposure (think multiple seconds) and no human I know of has hands that steady. As such, the sturdier your tripod is, the better.
- A camera remote, or if your camera is new enough and has in-built wireless connectrivity, a mobile app to remotely control your camera. In between these two extremes is a remote with in-built timing systems, which are usually called "intervalometers". Often it's much cheaper to buy a third party model, but you have to ensure it's compatible with your camera.
- Get off auto mode! If there's one thing that Auto can't do, it's fireworks. It'll try all manner of unhelpful things thinking you want a daylight shot, and it doesn't know if the lens cap is on, or if it's really dark. So take control and tell it what you're doing!

A tripod is essential.... Preferably a sturdy one.
This is the rig I've used for over 20 years. It's an aluminium tripod, with a three-way tilt head. If you look carefully at the right image, you'll see that the tilt up/down range is 30 degrees up, while it does 90 degrees down. This is common.
So how do I tilt up more?
I simply put the mounting plate backwards on my camera, install the whole camera/lens backwards into my head, and now I can tilt up 90 degrees!
It's a minor inconvenience, but it's so much more sturdy than most cheaper ball heads that can sag under loads, drift slowly over time, and worst yet, flop over in unhelpful ways... usually when you least want it to.
Why is a tripod essential?
If there's one thing that can make or break your firework photography, it's forgetting to bring your tripod. While cameras are getting better all the time, the simple truth is that unless you want to spend a lot of time merging dozens, perhaps hundreds of rapid-fire shots in post production... you're probably going to use a long exposure. Unfortunately, long exposures are not exactly known for being hand hold-able. Yes you can merge misaligned shots in post, but it won't be as good. So you need a tripod.
Now I've been to at dozens of major fireworks displays. The Sydney New Years fireworks, the National "Australia Day" fireworks show, Skyfire, even a fireworks company conference/demonstration show (which was amazing). No matter how big or small the fireworks show is, you've got plenty of potential sources of vibration/camera shake. Gusts of wind, the shockwaves of the really big explosions, people milling about and bumping into you and your tripod.
Any tripod is better than none, but...
This is one time, I suggest taking a heavier, sturdier tripod if you have one. Any tripod is better than none, but if you can get a nice sturdy tripod, and an equally sturdy head to mount the camera on, you're going to have much better photos. Obviously, the size/weight of your camera needs to be considered, along with how it's attached too.
You've got a sturdy platform, but you can still bump it during camera operation.
The cheapest and easiest way to eliminate camera shake's impact from blurring your photos. Is to put a delay between the time you move the camera (unintentionally as it may be), and the time it actually takes the photo.
Shutter delay:
Every camera made in the last fourty years, probably has some sort of shutter delay. How you set it varies from one model of camera to the next, but if you're using a Canon mirrorless or DSLR, chances are you need to select the "Drive" mode which usually has a 10 second delay (stopwatch icon) or the 2 second delay (stopwatch icon with a 2). Newer models have a third stopwatch icon with a C (for custom set time delay.. which I believe you can set in the settings menu).
How much delay do I need?
Well, that depends on your setup. If you're not using the sturdiest of tripod/head combinations, and if your camera's a bit heavy or big, or even poorly balanced, then I'd use the 10 second. If you're in still-ish conditions with a good sturdy setup, 2 seconds is more than enough.
Avoid pushing the buttons on the actual camera entirely!
Wait, what?! How does that work?
Never fear, you can use either a cabled remote, a wireless remote, or even control your camera from an app on your phone/tablet. Each have their pros and cons.
IMPORTANT: You usually need to set the camera to Bulb mode (sometimes labelled "B" on the mode dial/menu), particularly if you have an intervalometer.
Option1 : The cabled/wired remote:
A wired remote is particularly suited to older camera models. Especially those that don't have WiFi or Bluetooth technologies built in. (Like my cameras). While a remote in it's simplest form is often little more than a button, a sliding mechanism to hold the button in a pushed state, and a cable with some sort of compatible connector for your camera.... there are more advanced models.
Enter the "Intervalometer"....
Basically, it has the same features as the remote, but with a few extra features.
- Delay: This sets the time between hitting play on your program, and first shot. (Useful for allowing any shakes to die down before the first shot is taken).
- Long/Length: How long do you want each exposure to take, it could be seconds, or even hours.
- Interval (often Intvl): Assuming you are doing multiple shots in the program, how much time do you want between shots.
- N (Number of shots): If you're doing multiple shots, this specifies how many.
A little example:
So in short, let's say you want the camera to wait 10 seconds before taking the first shot to settle down. You want each shot to last 15 seconds long. You then want a 5 second interval between the shots, and you know (from the Firework event program) that it lasts 15 minutes. Since 15 second exposures + 5 second intervals is 20 seconds, you're going to get 3 exposures per minute. That means you'll probably need to take 45 exposures, assuming of course, that you want to make no changes during the event.
On the intervalometer model shown below, you'd use the left/right arrow buttons to select each setting, (A little underline would indicate which setting is currently highlighted on the very top of the display) hit "Ok"/"Set", then adjust your time values with up/down then hit "Set"/"Ok" again to confirm the setting, and then use the arrows move to the next setting. (You don't have to set all of the settings, if you just want one long exposure, then the interval, and number of shots can be left blank. You can also skip the initial delay, and the camera will start it's first shot immediately once the play button is hit.
Power saving is sometimes... a pain!
Ok, you've set everything up, it's ready to go. Leave the intervalometer on, it's using very little power, and will probably last hours if not days. That said, make sure the camera doesn't turn itself off if you got there early and you've been waiting for the show to start... for over 10 minutes (most cameras turn themselves off after this amount of inactivity by default). If you keep everything powered up and ready...
Then when the event starts, simply hit the play/stop button and the intervalometer will do what it's told and control the camera as indicated without any assistance from you. This is great if you have multiple cameras to manage, and you may have a wide angle, perfectly set up, focused, and then set to manual focus (so autofocus doesn't lead you astray), and you'll be doing the telephoto shots manually with another camera on another tripod.
Don't forget that there's often a "backlight" button on most intevalometers ! It's really handy in dark situations... like fireworks events.
If there's a problem, simply hit the play/stop on the remote and you're back in control, make adjustments to the camera (composition, lenses, focus, aperture/iso, etc). Or change the exposure length (on the intervalometer).
What if I'm not using Bulb mode on my camera?
Easy! The camera is in control of everything (including shutter speed) so each time the intervalometer triggers the shutter, the camera will take a shot, according to it's settings. If the camera exposure is longer than the intervalometer's settings, and the intervalometer tries to trigger the shutter again, the camera will ignore the "shutter presses" until the shot is finished, and then shoot again according to the camera's settings as soon as it's free again. (So you'll be skipping triggers, which means, fewer images than intended). If the length of exposure is shorter than the intervalometer's settings, then it'll take right number of shots, just with a faster shutter speed. (with all the exposure brightness/motion blur implications that normally has).
Option 2: Wireless Remote
Ok, so some camera brands build a wireless remote that talks directly to the camera. However most third-party models will have a proprietary receiver that simply plugs into the camera like a cabled remote/intervalometer. Remember that both the transmitter and receiver need charged batteries, and for them to be on the same channel/frequencies to work. Other than that, all the intervalometers have the same features, just different layouts. Refer to the manufacturer's manual for details.
Option 3: Mobile app to control your camera:
New cameras with fancy Bluetooth/Wi-Fi built in can be controlled from the convenience of your mobile phone or tablet. Now don't assume that the camera branded apps (say Canon or Fuji) are necessarily the best or most reliable apps. Personally I had lots of trouble with the Sony app, (Play memories) but found that third-party apps like Camrote, Shutter, and Time Lapse (different apps) worked way better with my little Sony compact camera, had a more reliable wireless connection, and better features.
Now, where the remotes and intervalometers required you to buy hardware the third-party apps may require you to buy software. Try the free manufacturer-supplied apps (you've got nothing to lose) but if you aren't a fan, you may need to buy a a more suitable alternative.

Camera remote control
When using "Bulb" mode, the camera runs a single exposure for as long as the button is pressed. A remote (or app) helps to reduce camera vibrations during operation (avoiding blurring) and allows exposures well beyond the 30 second in-camera limit if you'd like to.
That said, you can pre-program an intervalometer to have a specific length of exposure, a set delay between exposures, and take a set number of shots with the aforementioned duration and delays in between. It'll keep taking shots, exactly as you set until it's finished, or there's a problem (usually memory card is full, or the battery is flat).Of course, you don't have to use a remote (or app) with the bulb mode, it can be useful in any number of ways using the Manual mode, Aperture/Shutter priority, even Automatic if the exposure doesn't exceed the camera's (usual) 30 second limit.
One quick warning though....
If you have a wired remote, and leave it dangling from the camera while you step away, any breeze can swing/bang your remote against the tripod causing vibrations, and potentially damaging your remote. Just my voice of experience talking here.
When to choose a remote versus an app...
In short, if your camera is of an older persuasion (like mine) then it's likely that you will need to buy a remote/intervalometer like the one shown at the top of the image above. If you have a newer camera (particularly the higher end models) then it's likely that you will be able to do the same things by merely installing the appropriate app. That said, it's worth looking into third-party apps because as I found with my little Sony RX100 MK V, that a third-party app was much more reliable and offered features that Sony's own app didn't have.

Set the camera to manual mode
The most reliable way to do firework photography is through the manual mode.
While this may seem complicated, what you're really doing is simplifying the process, and ensuring that the camera's computer isn't going to interfere so you don't have to fight it or constantly make adjustments to the camera's own adjustments.. that you may (or may not) have wanted in the first place.
While you can use Shutter Value (S on the dial) or Time Value(T/TV on the dial), you'll need to compensate from one shot to the next. If there's a particularly bright firework going off in one shot, and a dimmer set in another, it will adjust aperture accordingly, and this will impact what (if anything) is in focus.

Switch the lens to manual focus
Firework photography is often done at a distance. Getting the scene focussed then turning the autofocus OFF by setting it to manual focus, or just manually focussing from the outset, eliminates the odds that the camera suddenly deciding to focus on something else during the fireworks display.
Please, for your sake, make sure to familiarise yourself with the your lens. Zoom lenses often have two rings. One controls the zoom, and the other does the focus. Adjusting the wrong one isn't hard to fix, but it's generally best to avoid bumping the focus ring unnecessarily. That said, some zooms may need refocussing at different focal lengths, anyway.

Consider image stabilization
Image stabilization (IS), optical image stabilization (OIS), vibration reduction (VR), these are just some of the terms each camera brand uses.
Older cameras have lenses with IS/OIS/VR in-built, and newer cameras contain such systems in the camera itself.
Many sites say to turn it off when using a tripod to stop it from compensating for non-existent vibrations... However, I've never had this problem. Try both with/without and come to your own conclusions.
(Oh and if you do turn it off, don't forget to turn it back on after the fireworks show).

If fireworks need slow shutter speeds... just how slow do I need to go?
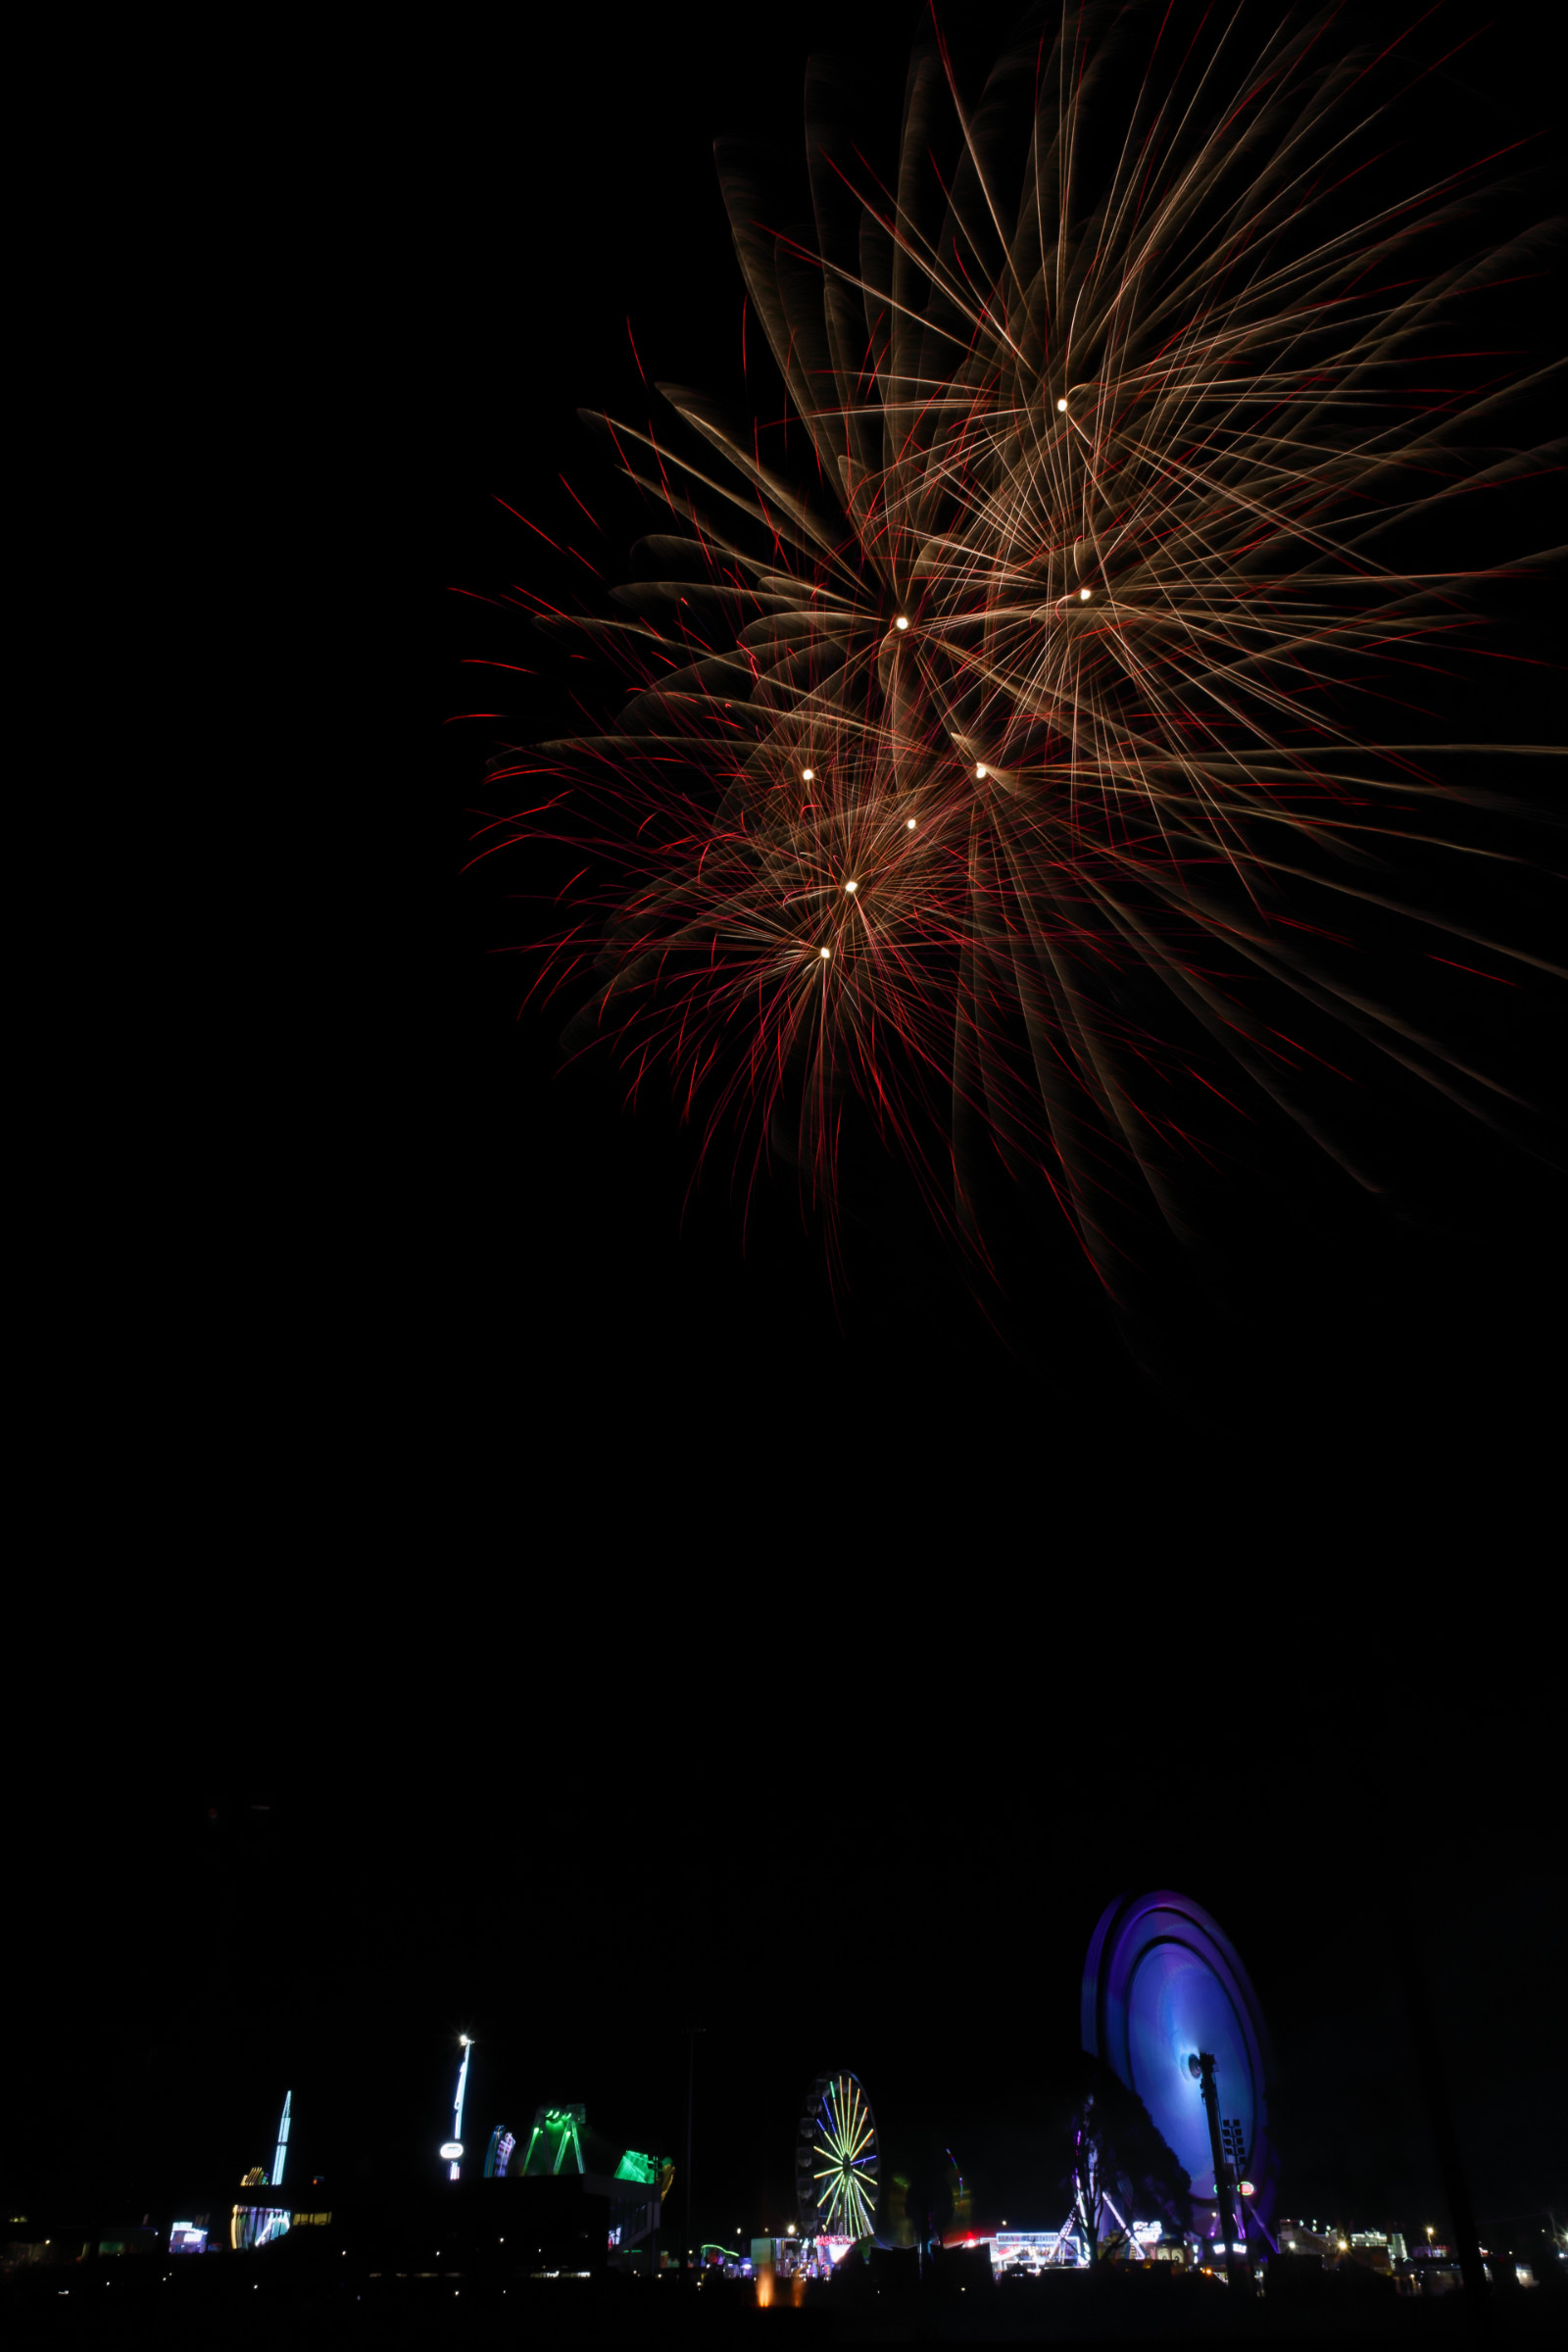
It takes a couple of tries to get the exposure right. Here I started at 4 seconds, and that just isn't long enough to allow the rides in the background to move, nor is it really long enough for the first few fireworks to show their captivating potential.
Now, if the rides were moving much more quickly, and there was a lot of fireworks going off at once, (like in the inevitable firework "grand finale") this four second exposure absolutely could have been a good setting to use. The fireworks displays often have bursts (literally and figuratively) of more/less fireworks going off.
However, four seconds, with the first few tentative fireworks going off, for this particular composition.....
Well... it left me a little underwhelmed. That said, if I had been zooming in to the central section of the detonation, that could have been a good detailed shot of the fireworks... but it would have lacked any context, it'd just be a burning array of embers (colourful as they may be) in a dark sky.
I chose to keep the composition, and simply extend the exposure time. That said, this shot wasn't a waste, because I could check if I had composed my shots correctly for the upcoming firework explosions, and four seconds is not going to leave you waiting long to make any adjustments.

Don't be afraid to drastically extend your exposure time
Most cameras can be set (without any additional equipment/apps) to take photos up to 30 seconds long. Remember this is often designated by 30" (the quotation mark is important) because if it just says 30, that's one thirtieth of a second.
I noticed that the rides were quite slow moving, and I really wanted them to have the motion blur that would make the rides seem more dynamic. So I upped the exposure to 25 seconds.
I really like how the rides now look more interesting, and provide a context for the fireworks.
Now that I've set up my position, my composition is looking good, the focus and shutter speeds are obviously reasonably "dialed in" and I like the shot, now you'll probably just see "variations on a theme" from here on.

Let the magic happen, and see what you get!
Once you're set up, and the fireworks show is underway, take the time to take a few shots with that setup.
Often, there's a few high-altitude explosions, mixed in with mid-altitude ones as shown here. Somewhere along the line, it's common to see fountains (fireworks spraying sparks from the ground, in straight launches, fanned out arrays, or even falling from bridges. (They don't always face upwards).. but they would in this case... given there's no bridge to drop down from.
In any event, setting your camera up with the best vantage helps immensely, and unfortunately many firework displays are packed with people.
This is why smaller firework shows are great!
If you think I could get this angle at the huge Sydney New Years Eve fireworks shows, you'd be sadly mistaken.
Here there was plenty of space, and I chose shoot from the opposite (and largely empty) side of the field, pointing back at the stadium (that shadowed building blocking the bottom section of the left circular ride), and intentionally put the likely launch area between me and the rides so I can include them into my composition. Since I was much closer to the launch site than the stadium, I had to point the camera more upwards and with a wider angle to get most of the scene in. This causes that leaning effect seen between the two fireworks, and the taller rides in the background. I could fix it in post, but this would cut off much of my upper corners of my shot.
Making minor tweaks and adjustments
You've set yourself up, you're getting some good shots, and you've let the magic happen. Great! Now the darker photographer impulses start to creep in, where you want to make a lot of changes (some of them big ones) and you want to make sure you didn't miss something.
Relax! Try a few small adjustment, one at a time and see how you go. If you rush off, you'll be fiddling with the camera, making haphazard (and often unnecessary) adjustments and just when you finally calm down.... then the show will be over.
Make the best of what you've already got!
In the intervening time between this one and the last, I actually zoomed out a whopping two millimetres, and tilted up a few degrees. Now I get most of those higher explosions, making the fireworks look more impressive in size. Admittely, at the expense of reducing the size of the rides in this image... so it's a trade off, like all things.

Making some more selective (rather than minor) tweaks...
Keeping track of mutiple changing objects in your shot is challenging but rewarding. That said, it's also easier when everything is dialed in, composed, and locked down in manual mode.
Here I changed the shutter speed from 25 to 13 seconds. Mostly because the rides were at full speed and I wanted to "balance" the image by dialing back the fireworks a bit. It took a few shots and a bit of luck but I got it with this one.
I know it's not going to suit everyone's tastes, but having gotten the other shots, I'm ok with a few less "busy" or "cluttered" ones. That said, if you were taking this on behalf of the show, and they were looking for publicity shots that show how exciting it is... it might not be the client's favourite.
However, I've had clients choose photos that I absolutely thought "less good", even though I only showed those images to demonstrate the diversity of my vantages.. and maybe find uses for what I consider "B roll images"... as backgrounds on web sites or something.
Simplification can clean up an image, but also separate features from one another.
Again, this is an image that will divide opinions. Have a look and see what you think...
With the shorter exposure, I managed to skip the launch trails arcing up into the sky. This has the effect of making the fireworks look smaller (or much higher) than some of the other images. Unfortunately, it also just looks like I added the fireworks in post production. I didn't, but it would be easy to do.
As a constant critic of my own work, I feel the image is less cohesive if used as is, and I'm tempted to add just one trail between the rides and the explosions above. It's not like they didn't happen, but I probably won't because I usually baulk at adding things not captured into images.
It's a philosophical quandry, and everyone's answer will be different.
That said...
To a graphic designer, this image would be a fantastic book cover or acknowledgements background... because you can put all manner of text in that convenient block of black in the middle.
So how the image gets used is just as important as how it's captured.
Splitting the difference between simplicity and cohesion...
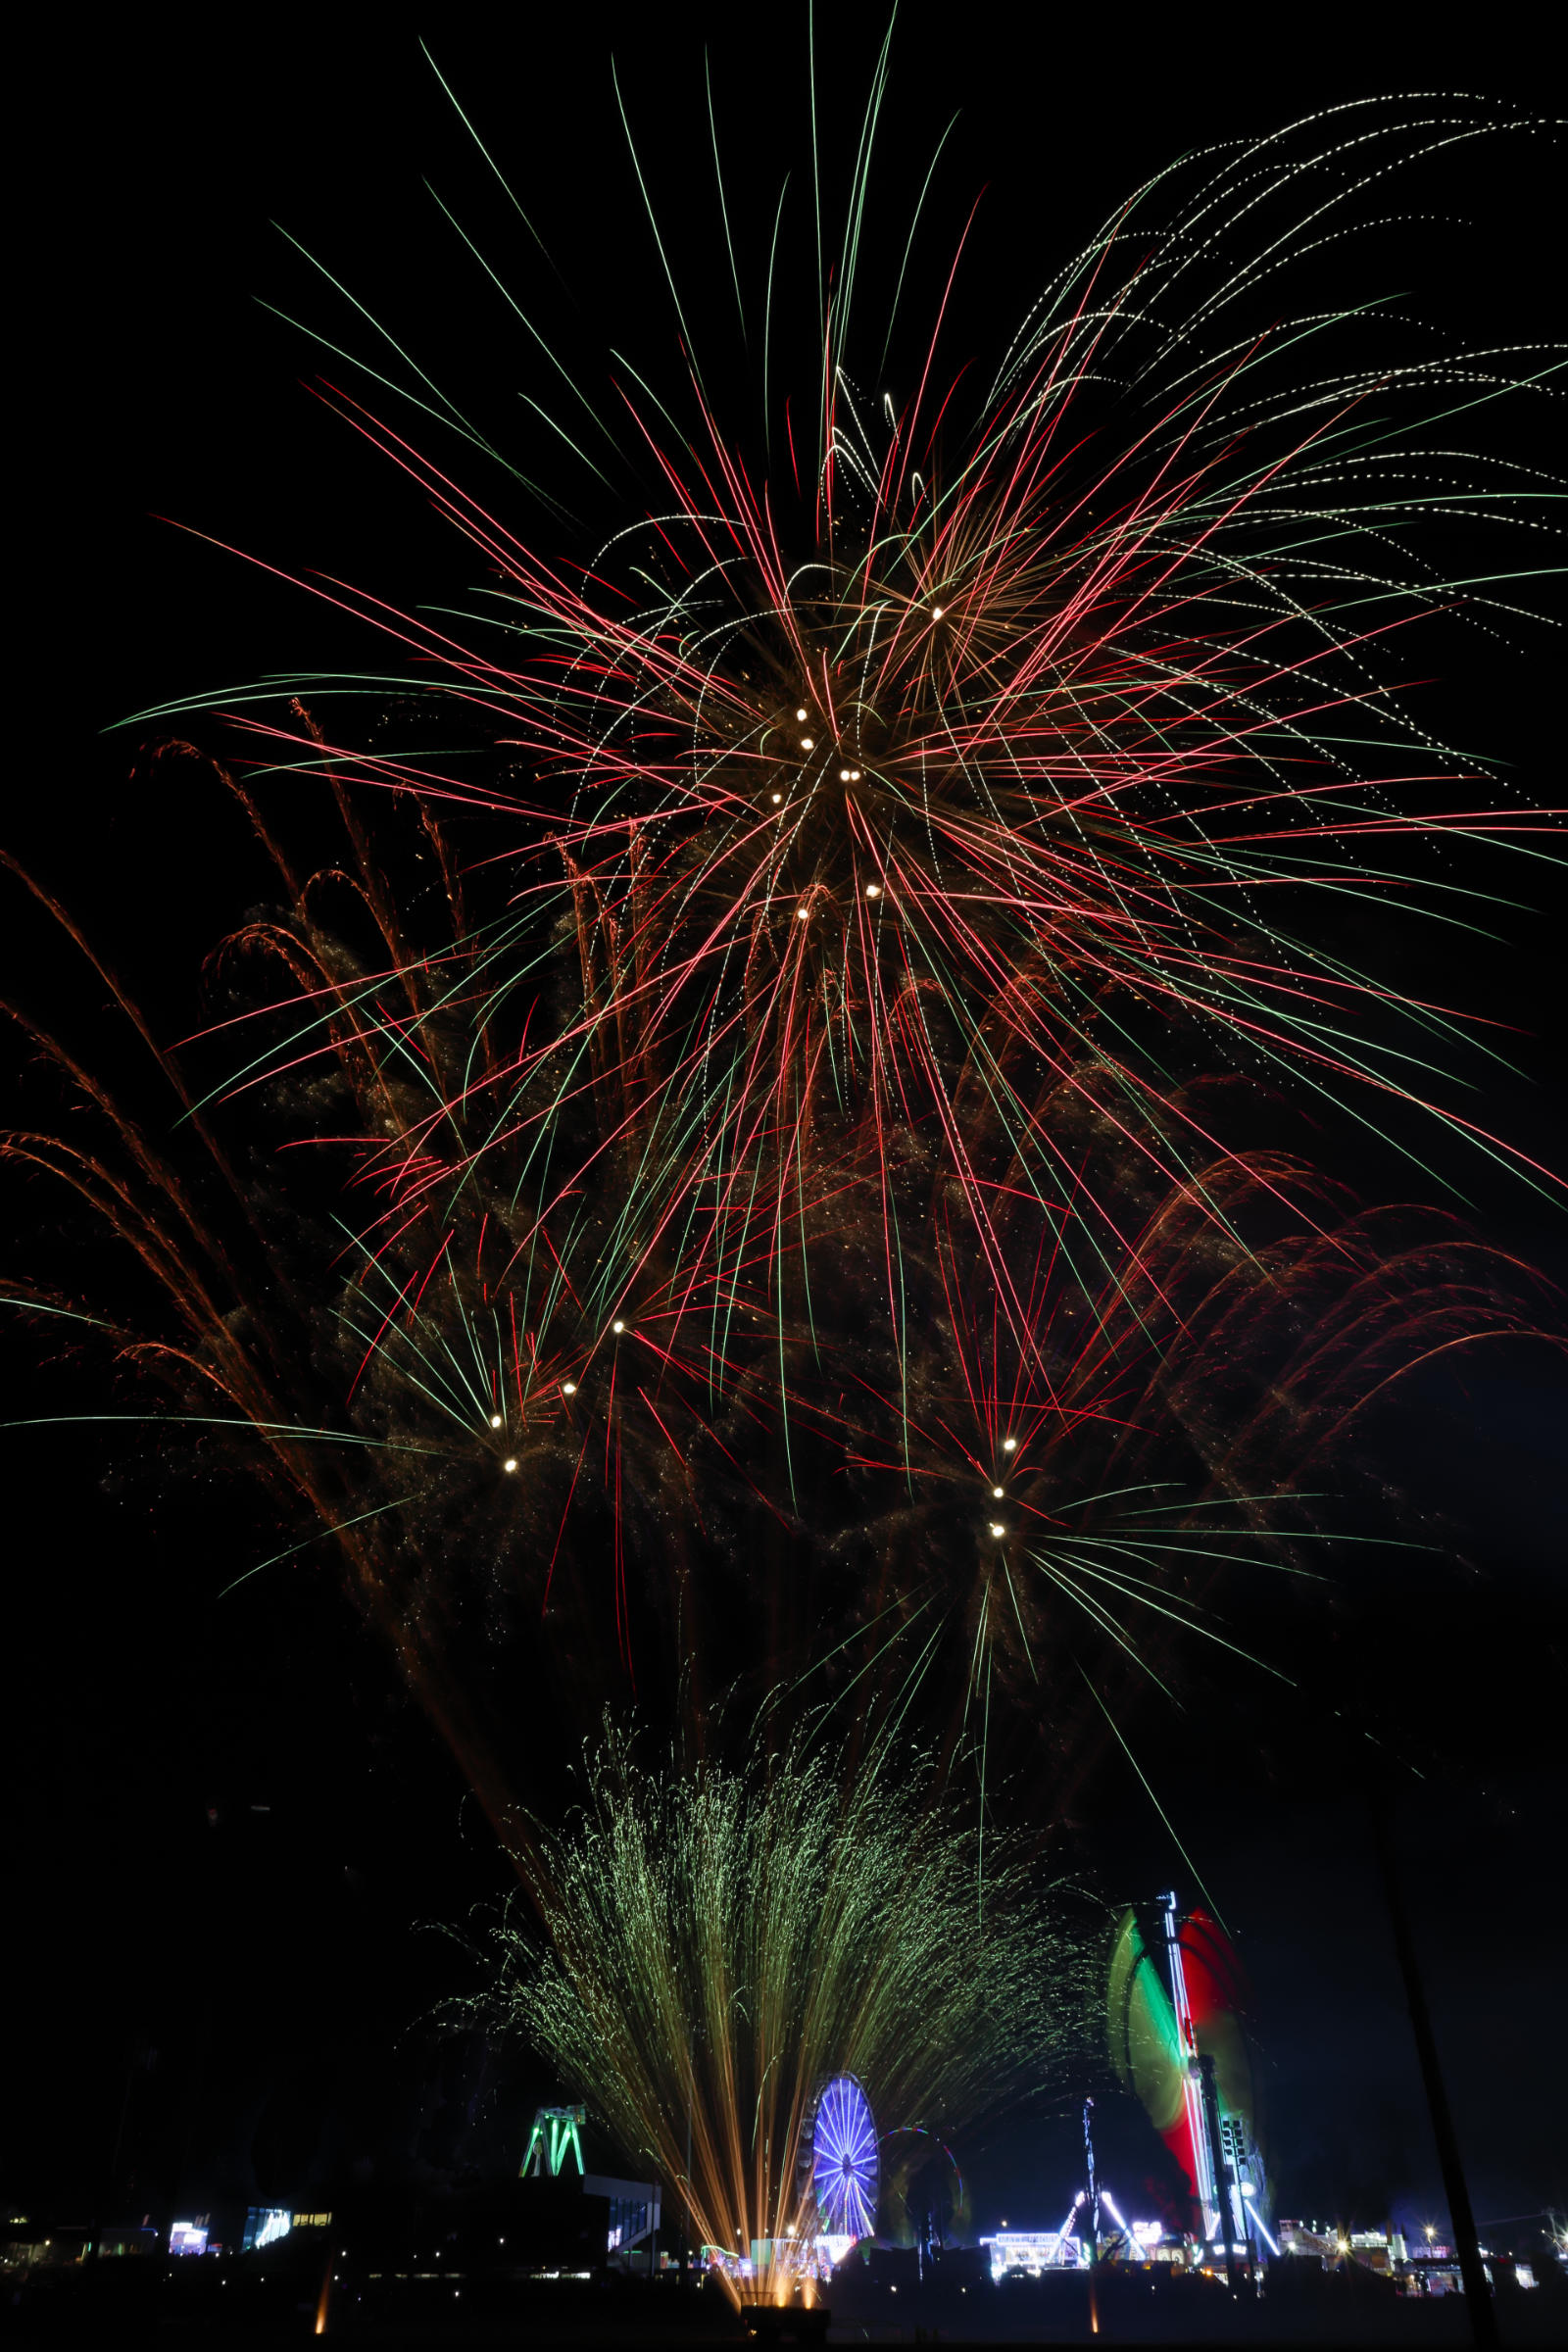
Ok, so this was getting pretty late in the fireworks display program and it was definitely winding up, now that they were adding firework fountains on the ground, mid-altitude and high-altitude explosions as well. I think I went back to 18-20 seconds at this point, trying to balance the rides in the background with the fireworks now that I didn't have to simplify things too much. That said, I think this was the first ground level fountain burst... so I had no idea that the rides would show up behind them.
It wasn't ideal, but I wasn't going to move to re-setup right as the peak (or crescendo if you're fancy) of firework activity was about to start. You know those "dark photographic urges?" well... if you're in the last half? third? (or even smaller fraction) of the program... this is perhaps the worst time to indulge in them.

Sometimes you can go too far in resisting urges....
Most firework displays end with a grand finale. Yes, it's done mostly to end on a really impressive "high note", but is also serves the purpose of firing of any unexploded/unlaunched fireworks for safety's sake.
However, for a photographer, it's probably wise at this point to shorten the exposure a bit to avoid shots like this.
Unfortunately, while I dialed it back to 10-ish seconds, I didn't know that the pyrotechnician (fireworks guy) had decided on a particularly intense finale. So my darker photography urges clearly would've been useful in this moment.
I added this shot because it's these real-world scenarios that few firework photography tutorials discuss, and "good advice" isn't universally helpful in all situations. I merely hope to increase your odds of success and believe you should adapt any advice to the situation you're facing as needed.
So which shot do you like the most? Are you willing to give it a go?
Honestly, I flip between favourites. I think they each have pros, cons, and situations where they would (and wouldn't) be suited for.
Obviously, I've given this fireworks display a go, and I'm sure I'll do others in time. I know it's tempting to go for the really big fireworks displays but the smaller ones are significantly easier to get to, find a good spot and can offer interesting/less over-photographed images.
Now, I would have loved to be much closer to the rides, set my camera up so that the fireworks are in the background.. but the crowds, the noise, and the sheer lack of space to shoot from that area, were major issues to contend with. So I opted for a view that includes the rides as the background instead. Sure it took about a kilometer of walking around the showground, and a bit of research into the fireworks launch area, but with a bit of deductive reasoning and a keen eye, I found a pretty good spot.
Problem solving is a key part of photography, whether that's shooting in challenging environments, adjusting exposures, finding a good spot, or just recomposing for best effect.
I hope this helps with your fireworks photography, or just inspires you to give it a go!
Happy shooting!
Ham.