
More comfortable, means different things to each person....
Now, my first kit was all about getting you from "scratch", cheaply, quickly, and with a multitude of general purposes in mind. Everything there could easily be used for wood working, general DIY, even crafting of various types. In fact, even though I have a ton of tools, I often come back to this style of kit for simple tasks, emergencies, when power tools will bother someone, or when someone has borrowed the better tools. There's nothing wrong with that, and you won't really outgrow them completely.
That said...
Using tools in a kit that basic is by no means the best way to do things in every situation. Yet, from that basic kit, you can go in an endless sea of different directions. Consequently, it's difficult for me to predict just what tasks you want to do, and how that may differ from someone else.
Knowing this, I'll try to keep this as "general-purpose as possible", and since you're getting more comfortable, you'll be more confident with which recommended items suit you, and let's face it, these items will make your life easier, less stressful, and further bolster your capabilities.
So let's get started!

A workbench to work on....
In the basic kit, you're using a cutting mat to protect a table you likely already own. However, having a dedicated (sacrificial?) workbench to do most of your work on will be a massive boon to your DIY game.
There's no right or wrong way to do this. Just ways that are right or wrong for your situation. Some options include:
- If you find a free table in the local classifieds and use that in a quiet corner of the garage, great! Tip: you can later disassemble, or modify it as your needs change too because wood is expensive. :-)
- Alternatively, you could buy a couple of saw horses and slap a plank across the top for a mobile option (top left). Many job site/mobile builders do this. There's also the Bora "Centipede" system (bottom left) which is also really handy, packs up tightly, and isn't obscenely expensive.
- You could also buy/build a wall mounted bench kit that folds flat against the wall when not in use for a space saving solution. (top right)
- Use standard modular garage shelving to make a bench is a quick and readily available option (bottom middle)... as is...
- Buying a pre-made garage workbench/trolley with a ton of drawers... if that suits your needs.
- Lastly (but certainly not least) you could build a proper "bench kit", or your own personalized DIY workbench to your exact specifications which in all honesty, is a right of passage for any DIYer. That said, it's easy to spend a lot on such things... so design your project carefully. (A kit can be seen in the bottom right).

Mess Management... The Sooner, The Better!
Now isn't this about tools? Well yes... but this is also about being more comfortable in doing DIY on a multitude of levels. There's one thing that almost a certainty to happen, and that's mess. Whether it's chunks of metal, wood, glass, or plastic that have been trimmed off, or the fine powders of paint, wood and plasterboard created during sanding.. you need a way to handle all this.
Now, I'm going to assume you have a bin for your DIY refuse already. However, sweeping up larger debris from the floor is much easier on your back with a full length broom and a dust pan. But if space is tight... skip this and get....
... a shorter hand held brush and dustpan. It helps to sweep things off the benches and timber bits without getting splinters. I probably use this the most, and have several around the shop. The simple truth, is that's there's a lot of mess-related bits that are too oddly shaped, heavy, or large to be handled by the air filters and vacuums attached to sanders and saws.... so it all ends up on the floor. So this leads me to...
Perhaps most importantly, I suggest a shop vacuum not only handles the dust off the floor like a regular household vacuum, you can attach them directly to a variety of tools to handle smaller shavings and dust at the source. (Usually with additional connectors and adaptors)
Now, while you may already have a dustpan and broom, and likely a household vacuum....
I don't recommend using those for DIY activities. They get all kinds of muck on them like glue, paint, varnish, plaster, and all manner of unsafe debris... just get a couple of dedicated dustpans and brooms/brushes for the DIY stuff (they're not expensive).
Don't use expensive, domestic vacuums...
If you try to use your domestic vacuum for workshop purposes... it'll encourage cross contamination in your living spaces, and can damage even expensive Dyson models. (Not good if your better half demands you go out and buy a replacement). Sanding dust can be as fine, if not finer than household dust, and so you need better dust bags, and much better (heavier duty) filters. So don't think all domestic vacuums claiming to be "HEPA" rated... are equivalent to industrial models.
While it's nice to have a Festool "Dust extractor"... it's too expensive to list here for people at this stage. So, I highly recommend getting a cheap-to-mid-range $100-400 shop vac if you plan on doing a lot of sanding, want to invest in some stationary tools like a table or mitre saw, and getting the adaptors to connect them. However ensure that the vacuum includes:
- All floor cleaning attachments, because models listed as "dust extractors" don't always have them.
- Have fabric (not paper) bags available... fabric lasts longer, and often cleans better.
- Spare parts like filters are easily replaceable and available.
- Maybe even include an attachment for a tool or two (unlikely, at the dirt-cheap end but some mid-range models do have this in the default kit)
- Has the widest intake pipe you can find. Don't buy anything with a 32mm pipe. A 35mm, or better yet 50mm or more... is much less likely to clog and burn the motor out.
- Ideally, a HEPA rated filter. If not, the dust mask from the previous list should be worn.. but if you're sanding, you should be wearing it anyway.
No matter what quality the vacuum is, at the very least, it'll filter out most of the dust that would otherwise be going onto the floor, work bench, and/or lingering in the air. This makes the workshop a much nicer place to be and increases both safety and comfort. However, it's just a vacuum, so don't expect perfect, hermetically sealed, completely dust-free air.. that's not realistic.
Vacuums help, but using a vacuum often helps more.
That said... I can't stress how much of a difference, regular cleaning makes in a workshop. Spend just 5-10 mins at the end of the day, putting tools away, and a quick run around with a broom and vacuum, and you'll save at least 30 minutes the next day not looking for that misplaced tool. That's a lesson I learned the hard way... many times.

Key tools for preventing disaster.
Stud finder:
First, we have a stud finder (the blue device on the left of the image). This is the one I have owned and used for the last few years. Not only does it help you to find studs, so you can attach wall-mounted cabinetry without ripping your entire plasterboard/dry wall out with it. It detects both metal pipes, and electric wires within wall cavities...(in certain circumstances, it's not so great if you have aluminium lining on your insulation panels, or have plastic water pipes).
By using this device, you have a way to reduce the likelihood of drilling into your water pipes, or electrocuting yourself when hanging a picture. (Don't laugh, this has happened).
RCD (Residual Current Device)
The yellow cord is an electrical extension cord. What makes it special is the included RCD device. RCDs are safety devices that basically detect power anomalies between the power flowing in and out of the device.. since power flowing both ways (whenever a tool is operating) should be equal and cancel each other out, if there is a "residual" (or difference) that means some power isn't going where it should... This happens when power flows into the ground or some other unknown circuit... and this is bad because it might be passing through a human body.. if living creatures are part of a mains voltage circuit, that's called electrocution. The RCD turns the power off in some obscenely small amount of time, usually 1/20,000th of a second, saving lives. It can also stop your house burning down.
You might think, "Don't I already have one?"
Now most homes in Australia (and many other countries) have RCDs built into their power distribution panels (wherever your circuit breakers may be located)... However, it's nice to have a second one when using power tools, just in case your circular saw cuts through it's own cord, or drill is a bit damp and you're on a metal ladder. These things increase the odds of electrocution. So add another one... just in case. I have extras on my toaster, and had every circuit in the house fitted with it's own. I've had two close calls, both occurred when a cable was there that I simply didn't know about, and unfortuantely when the stud finder fails, the RCD saved this Ham's bacon.
Power outlet tester:
If you look at the bottom right of the image, you'll see a power outlet tester. This one is made by the reputable-but-often expensive brand Fluke (sells for around $60 Australian). Now the one thing that most people forget is that for electrical safety to work (and RCDs to function) is that the outlet it's plugged into, needs to be correctly wired.
Never assume your wiring is perfect! Or that the switch is always fully functional.
I've had professional tradespeople come in, start working on our wiring... install an outlet, then leave. I come in with my trusty socket tester, and although it's working perfectly, the Earth isn't connected properly.. or the Live and Neutral wires are reversed. You wouldn't know if the Live and Neutral are reversed (AC flows both ways afterall) but it can impact the function of touch-sensitive outlets/switches, and if an appliance needs the Earth connection, and it's not present, that can be very dangerous.
AC Voltage Detection Wand:
The pen-like device in the top of the image can save your life. When working on any sort of electrical job (always test the wand's functionality with a known-live circuit just before starting work, just in case the battery is flat or something) it usually lights up and possibly beeps in the presence of live AC voltage.... depending on the model.
A dangerous hypothetical situation:
Now, imagine you're changing a light bulb, and the light switch on the wall is off... it's completely voltage free, right? It's ok to dust the cobwebs out of the socket with your finger, right?
Ummm, no. Don't do that!
Remember this is AC (alternating current). More often than not, there's at least one connection that's permanently live (Usually the live is connected at the socket, but then passed through a "detour" wire to the switch, which then has another wire back to the socket, it then passes through the bulb when it's installed in the socket, then out through the Neutral.
That Neutral is always live, and power flows backwards at least 25 times a second (sometimes 30) into whatever path it's given (say a finger).
The wand allows you to know when the right circuit on your breaker panel has been turned off. (Now both Live and Neutral should be off... if wired properly) It's easy to flick the wrong circuit... and if you don't have a wand, you might be in for a "shock" if you go to work, completely oblivious to the danger. Now a good Fluke branded one can be about $70 Australian or so... but it's worth every cent. I tried a $12 cheap model.. and it gave both false positive (live is on when it wasn't) and more dangerously, false negatives (no power detected, even when it was placed near a lamp that was on).... so buy a quality one for piece of mind.

A Random Orbit Sander (ROS)
Which size suits my needs?
A smaller model is best for getting into smaller spaces, and are lighter in weight (important for long periods of sanding on vertical and ceiling work, I assure you). Conversely, larger models do larger areas in much shorter times.. but cost more and larger sanding disks will of course, also cost more.
Why is a sander so important?
Honestly, after a drill, this is perhaps the second power tool I'd recommend anyone get.
They're not only useful in wood working, (and you will need a sander for that) but for stripping old paint/varnishes on existing furniture, as well as prepping walls, ceilings, window frames, doors and much, much more in DIY tasks around the home.
What features should I look for in an ROS?
In no particular order:
- A dust port (usually to attach a bag, but it's much better to connect it to your shop vac), if you can get one with a circular dust port, it'll be much easier to connect to a vacuum than oddly-shaped ports.
- Variable speed control (There are times when this is handy, particularly with coarse, lower grit sand paper pads),
- The option to use different types of backing pads (hard backing pads are great for flat surfaces and sharp edges. Soft pads are for curved, convex and to a lesser extent, concave surfaces). Some sanders even come with differently sized pads of 4/5" (100/125mm) pads for various situations. Better brands may include these in the box with your sander, but others may sell them separately as additional accessories.
- Excellent dust management (many cheaper end models only have 6-10 holes in the sanding pad with corresponding holes in the sandpaper disks too for dust extraction. It may seem counterintuitive, but more holes in the pad/paper actually help the sand paper to last longer, avoid clogging, and improve surface finish quality. Expensive sanders like Festool, use a whole host of holes in their sanding pads (and you have to buy more costly Festool branded sandpaper disks to match those holes.. but they last longer so it evens out). The "best" sanders use sandpaper that's more like kitchen strainer mesh with grit attached, and are pneumatically powered and have insane dust port suction to capture as much dust as possible. If you're interested, have a look at the "Mirka" brand for this, but expect eye-watering price tags.
- Corded rather than cordless: I'm sure some will disagree with me, and I do like cordless tools when they're suitable. That said, unlike most tools, a sander needs to run for long periods of time. Not the short bursts that a drill, or circular saw might be used in. As such, batteries get drained pretty quickly on sanders. If you're doing the smart thing of connecting the shop vac to handle the dust, (because the dust bags/filters that they usually come with.... aren't exactly great) you're already tethered to a device via the hose. Adding a cable ensures greater power reliability and offers little-to-no added inconvenience.
Do I really need an expensive sander?
As a DIYer? No. The "not-so-well-kept secret" in sanding is that it's the sand paper that does all the work... the motors just move it around. A cheap tool used well, might take a little longer, but can render the same result as an expensive one. Have a look into better sandpaper... many people recommend 3M's "Cubitron" range, which works just as well for a cheap sander, as an expensive one. Heck, buy the big box of sandpaper disks for the bulk savings, you'll probably use them. That said, if you're spending a lot of time on sanding.. then the better and more expensive models of sander will pay themselves off in speed, and comfort along the way.
Have a look at my other page, describing various sanders for usage tips, found here:
Sander Types & Uses
Why recommend the ROS instead of the other sander types?
Honestly, it's the ROS's balance between general versatility, price, availablility of tools/supplies, and ease of use that I think will suit most people. Smaller sanders, and even oscillating tools with sanding attachments are too slow to be "the one" sander you should have. Larger models are too heavy, expensive, and potentially damaging for people in the earlier stages of their DIY journey.
I can't imagine that you'll be unhappy about having an ROS, especially once you're freed from the old block and sandpaper... and connect it to a shop vacuum to handle the mess. :~)

Wide Mouth Sauce Bottle & Silicone Basting Brush.... For wood working?!
A squeeze bottle with a wider-than-average mouth (but still capped with a pointy nozzle) for everyday saucy condiments, might seem at first glance, an odd recommendation for a tool kit expansion... never mind the silicone basting brushes... but please bear with me. However, it's amazing, cheap, and makes your wood working life easier... let me explain.
The larger squeeze bottle is an easy way to put glue on your wood joints, with the additional advantage of being easy to refill from larger glue bottles. (No funnels required) Meanwhile, the humble silicone-bristled basting brush is a much easier-to-clean way to spread wood glues evenly... without destroying your paint brushes, covering your hands with glue.
Wide mouth sauce bottles, at a princely sum of $3.50 (on average, here in Australia) found in many "dollar" discount stores, hardware stores, larger chain stores, and of course, commercial kitchen suppliers, you might be wondering why this dirt-cheap item isn't in my original tool box kit.
Well, many absolute DIY beginners would balk at spending $35-$130 on a 4L (roughly 1.1 gallons) vat of PVA (wood) glue when their entire toolbox costs only $100-500... the discounts obtained through bulk glue purchases, simply aren't relevant for folks dipping their toe in the DIY waters.
Can't I just refill the "off the shelf" glue bottles from larger vats with a funnel?
Yes... but the narrow opening on them needs a narrow funnel, and glue viscosity slows the pour down considerably... did I mention that the glue will start drying... and then the funnel needs to be cleaned up..... but you might have a half-glued project that needs attending to... and this is especially true in 42 Celsius (100F) days. That glue will dry quickly.
Hence my recommendation to skip the funnel altogether, (it's probably more expensive than this bottle anyway) and get a clear-ish, wide mouth sauce bottle, and I do so for the following reasons:
- It's a dirt-cheap way to store and apply glue to your projects in a convenient manner.
- Refilling from larger glue bottles becomes a simple matter of pouring into the wider mouth. No funnel required. (Less mess and fewer hands required during pouring).
- A 1L bottle is often 2, 3 or even 10 times larger than most commercial squeeze bottles, so you refill less often, making you a faster worker. (Important when glue is drying, and just ran out in the sauce bottle).
- You can see through the translucent/clear sides to see how much remains in the bottle at a glance (many commercial bottles don't have this simple benefit)
- Buying glue in bulk bottles/vats, and then dispensing it into sauce bottles saves an absolute fortune over time.
NOTE: Just make sure you get one where the nozzle can be capped, or it'll dry out and end up clogged. :-)
Back to the silicone brush....
Can't I use paint brushes to spread glue instead of a silicone basting brush?
Sure, but honestly even cheap brushes are more expensive than the basting brush... and if you forget to clean the brush even once, it's basically only fit for landfill. Save your paint brushes for paint, and get a variety of silicone brush sizes for edge glue-ups and bigger ones for larger areas. However, if you find the bristles are too long/floppy for you, feel free to give the silicone bristles a "hair cut" and trim them down to better length.

Some modular, one-handed clamps....
Now, may I humbly suggest one of two strategies here?
Option 1: (Cheap option) Buy a set of four (4) cheap F clamps, (bottom of the image) about 300-450mm (12-18") long. You might be wondering, why not the smaller lengths? Well the handle is usually 150-200mm long, add the thread, clamping pad, then the opposing clamping pad et al... so even compressed into the smallest configuration your clamps are still at least 250-300 long when in storage.. you'll find the additional 150mm much more versatile for minimal storage space penalty.
Of course, if you can scrounge some old clamps from friends and family, garage sales, etc... it does work... which is what I did for a long time, but you end up with a mixed up set, and you always find that the clamps you have left.. never quite work as well/reach far enough. That's a pain if the glue is drying quickly on a hot summer's day. So standardizing, or at least making the small ones as versatile as possible is a huge help.
Option 2: (Longer-term investment/space saving option) Instead of buying a number of cheap clamps, and then buying a completely new set of bigger ones as your project sizes grow... how does a modular clamping system sound? (See image top right.. and a cheaper, reversible, but not quite so versatile clamp style, top left)
While there are several brands of "reversible trigger style" F clamps like the ones shown in the top-right above, I've found this Irwin "Quick Grip" system to be particularly helpful for the following reasons:
- You can join two clamps together: (with joiner accessory, naturally sold separately, but you can make these yourself pretty easily) to make one bigger clamp.. that's really handy for the smaller storage requirements since you don't have long clamp bars to contend with, but the combined size helps when taking on the occasional "larger" project... but don't want to store 600-1300mm long clamps.
- You can reverse them so they spread two things apart: Great for gentle (no whacking) disassembly of tight joints, or ensuring you hold something far enough apart for precise glue-up positioning, and opposing any other clamps in may squeeze things too closely together before the glue sets.
- There are right-angled pads: (Another separately sold accessory) You can ensure corner joints are held together at 90 degrees, that's really handy for glue-ups. Unfortunately, while they do help adhesion of right-angled joints, they don't guarantee precise 90 degree angles. (See my next recommendation for that)
- One handed operation: The trigger system is a huge help when you're working alone. You simply can't do that with most other clamps... holding it in place as you tighten clamps up usually requires two hands, at least... initially.
I don't recommend that you simply go out and buy the biggest clamps in the system, but I can understand the temptation when there's only a minor difference in price to go from 600mm models to a 1270mm... the larger sizes can come in handy if you're building cabinetry, tables, trolleys and larger drawers..but they can be a liability/workshop trip hazard if they stick out miles from smaller projects. Start small and add what you need over time. I would say get four, that way you can clamp four sides to a box bottom/top.. and then see how you go from there.
Careful, clamp acquisition is a sickness that leads to all kinds of hoarding tendencies. Hehe.

Clamping squares, don't seem important until your glue up becomes "out of square" and has hardened there.
In short, it really helps to hold wood not only in place (like clamps do) but at the right angles as well, especially when glue is drying. So that's what these squares do.
I have a confession...
I didn't get anything like these squares, until I glued up a drawer, clamped it down, checked that it was square, then left.
Sounds good so far, right?
Except, that over the next 10 minutes, before the glue really started to harden, the tension of the clamps pulled my once-square drawer, slowly, and inexorably into a parallelogram (a process called "racking" in wood working). Then the glue dried.
Now it wasn't much, and given the large size of my drawer, wasn't overly noticeable to the naked eye. Until I installed it into the cabinet... and I noticed that one side of my drawer stuck about 7mm (about a quarter inch) further forward than the the other when fully installed.
<insert unkind words here>
There was little space left in the back of the cabinet, so I had no choice but to have one side stick out of my cabinet... at least, until I built the drawer again.
So why do I recommend these squares to you?
Simple, I understand that you may be learning DIY skills, and need to take some of the quesswork out. Also, they're just handy to see if a tool is cutting "square", or at 45 degrees. Also, they're great for making a number of temporary jigs with your other tools.
So what sort of square do I need?
The clamping squares sold commercially are usually made out of aluminium or plastic. It's not always cheaper to buy the plastic ones, so do your own research.
Some L-bracket styled ones use don't come with any clamps, so use whatever other clamps that you have. (see left of the image) and these can clamp some rather thick pieces of wood. Alternatively, the L-bracket models can come with their own clamping attachments/knobs (see right of the image above). Just note that the attachments are quite limiting in the thickness of wood they can handle, but will free up your other clamps when working on picture frames and other thinner wood pieces.
The triangular squares offer the addtional 45 degree corners, but are often a little more expensive. Going to the "top end", you can use high quality, precision ground welding squares for both metal and wood working too, but they can be frightfully expensive. (Search for "Fireball Tool" in your search engine of choice, if interested).
Honestly, this is where eBay and AliExpress shine for value (although watch those shipping fees/taxes). I have a bunch of the L style metal models in various sizes ranging from 100mm, 150mm, and 200mm side lengths, as well as some triangular ones. You don't need to spend much, but you will need at least 4, and each of those will need two clamps, or two clamping attachments.
If you're going this way, I'd recommend buying 150mm (6") or even 200mm (8") models (each side is that length) if you're building shelving, the larger sizes are ultimately, more accurate than the smaller models. That said, if you work on smaller projects, then maybe the 75mm/100mm (3 or 4 inches) are better suited.
DIY squares
There are a number of ways people can make them. Some people take the factory-set 90 degree edge of manufactured wood sheets (MDF/ply wood) then cut L shapes using "stopped cuts" on a table saw (something we haven't discussed yet) in progressively smaller sides for a variety of L-bracket styled squares, for stronger models, they cut the corners off the same sheets, into triangles then cut holes for clamps to grab, and if even that isn't enough, they'll glue multiple identical layers on top for additional support and strength. However, gluing layers can skew the angles if you aren't careful.

Japanese Pull Saw - Ryoba sub type
Japanese saws are very different from any western hand saw you've used. They cut on the pull stroke (rather than western styles which cut on the push), this means the blades are thinner, more flexible, and offer less resistance... so they're much easier to use in a variety of circumstances.
Some Japanese saws come with replaceable blades, or a variety of blades for a single handle... (although please note that the connections between blade and handle are often brand specific). Which detach or fold to compress down nicely when not in use. Higher quality ones have fixed handles. Which makes them longer and need a little room for storage. However, while the good ones can be very expensive, most of the cheaper end brands are very good, and on average are better value than western specialist blades like backsaws and such. So these get my "earlier" recommendation.
Actually, there are quite a few varieties of Japanese saws, some examples include:
- Dozuki (great for fine joinery)
- Kataba Yokobiki (generally precise cross cuts)
- Mawashibiki (cuts curves, much like a keyhole saw)
- Azebiki (mini Ryoba)
- Kugihiki (Flush cut saw)
... amongst others. So why the Ryoba?
Well, it's two saws for the price of one. One edge has a coarser "rip cut" blade, and the other side is the finer "cross cut" blade. This makes it one of the most versatile introductory Japanese saws.
Again... once you get one Japanese saw, and get comfortable with using it.. you'll think about trying some of the other types, and they are also pretty amazing. After the Ryoba, may I humbly suggest a flush cut saw (also called "Kugihiki", but most sellers simply label it as a "flush cut" saw in English).
Anyway, I grab these saws whenever I'm not cutting metal with my hacksaw, or not using a power tool, so I heartily recommend them.

Socket sets, taking nuts and bolts to the next level.
In my beginner kit, you bought a couple of adjustable wrenches (or "shifting spanners" here in Australia). They work well in situations where the bolt head and nut are proud of their surroundings, but if you've got a bolt head, nut (or both) sunk deep into a countersunk hole, or deep in the fins of a lawn mower engine, then those shifter's won't be much help.
A socket is simply a hollow metal cylinder, with a hexagonal hole on one side for your bolt/nut, and another hole to insert a ratcheting handle, or even a custom screwdriver handle. You can approach the nut/bolt from directly above, and there's usually one, or even several attachments you can use to work more quickly and effectively.
Sockets can come in a variety of sizes (for different sized nuts/bolts), and of course, in both metric and imperial measurements. Obviously, it makes sense to buy the system your country uses, but I've often come across imperial bolts in old machinery, even here in an obsessively metric country like Oz.
Socket sets can be as basic or comprehensive as you like. Some sets are just a handful of sockets with a handle, others are comprehensive mechanic kits that fill several drawers with every socket size/type you can imagine in a dedicated mechanical tool trolley. It's important to pick a socket set that meets your needs.
Generally, I'd say a range of sockets from 3mm-25mm (1/8-1" if you use imperial should cover most household DIY jobs). Some sets even cover this range in both metric and imperial measurements.
Often, you'll see sets based on their "drive" or connector size (the back end of the socket) and they're usually in imperial measurements, even though the sockets you attach could be either metric or imperial. Common "drive sizes" fall into 1/4", 1/2", 3/8" Some set will have a single "drive" size for the set. Others may use the quarter inch drive system for the small sockets, and 3/8" or half inch for the larger sized sockets for additional torque strength. Keep this in mind once you have a set, because any additional sockets need to fit your ratchet handle and other accessories. Even if you don't have the right one there are adaptors to switch between drive sizes that are obtainable from many stores and online.
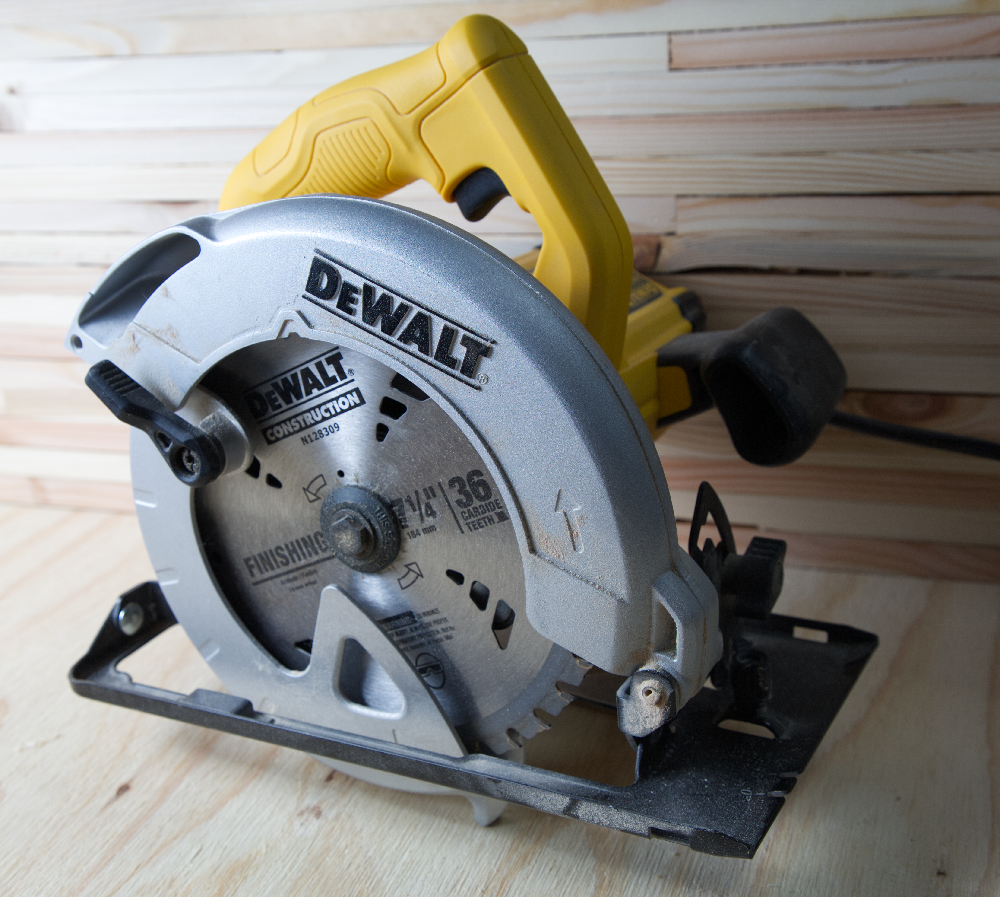
The venerable circular saw
That's not to say they're the easiest tools to master. I really want you to look into some circular saw videos online to boost your confidence and of course, improve your odds of safety and success. They work very well, but don't expect perfect cuts every time.. it won't happen for absolute beginners.
However, while I do own (ahem, several) I use them mostly to break down the sheet stock that's too large for my table saw, then trim it to final dimensions on the table saw. I can see why people start with them, truly... but I almost want to push you to strongly consider some more useful saws that are much easier to use, offer repeatable cuts with minimal effort, and will be used more often than a circular saw if you have any of them.
Which brings me to the beating heart of my workshop....

The trusty table saw will make your wood working journey so much better.
Isn't this a bit much at this stage? Well let me put it this way, a circular saw can cost from $99 (Australian) all the way to $600. A track saw (basically the same thing with a straight edge) can go up to $1500, and even beyond for longer track lengths. So suddenly a portable "job site" saw at $1200 (or less in a sale.. possibly including a free circular saw as part of the redemption... which is how I got some of mine)... makes a lot of sense for those who really like precise cuts.
What makes a table saw so great, is that it excels at cutting things to the set dimensions, parallel to any straight edge that's referenced. The fence is a moveable reference point/wall that's parallel to the blade (if the saw's properly calibrated, that is) so if you set the fence to be a set distance from the blade, you can set it once, lock the fence in place, ensure the blade is raised enough to cut the thickness of your boards (but not much more for safety's sake) and you can cut as many pieces of identically wide wood as you'd like without moving the blade, or changing anything. This makes building lots of identical straight pieces of wood so much faster. Which is handy, particularly in cabinetry, drawer making, or any project where consistency is beneficial.
I use my table saw for over 95% of my projects. I make plans, calculate dimensions, then just cut the bits to spec on it. Easy peasy! I'd probably take 5-6 times longer if I just used a circular saw, since every cut needs me to move my straight edge to the right location... then make the cut, then move it again.... and it's never as consistent as I'd like it to be. :~)
That said, table saws come in a variety of sizes and price points. This is actually a cheaper one, and I've used it for almost a decade now, and I don't realistically need anything fancier.. but have a look at my page on saws, found here:
Saw Types and Uses

The humble caulking gun... not as simple it used to be.
Yes... simplicity..
At the most fundamental level, you insert (silicone sealer/glue/gap filler/expanding foam/etc) and it squeezes it through a nozzle (like the sauce bottle above) to apply notoriously sticky substances to whatever it is you're trying to do.
Unfortunately, it used to be simple. A $4 model was literally just as easy to use (maybe with a little less leverage) as a $30 model. Afterall.. it did the same job.
Now there's caulking guns (usually quite open in design, see image left) that use the same old rigid tubes full of (insert stuff here) as the "guns of yore", but there's also new ones that take soft plastic "sausages" in different sizes... these guns usually have rigid sealed tubes as part of the gun, rather than the consumable glue/silicone tube... and the tubes can be different sizes.. They're not too scary though, since they still have the plunger and trigger at one end, and nozzle at the other. (see middle)
Getting technological... perhaps unnecessarily:
With the rise of the cordless tools, many caulking guns are starting to be powered by batteries for an easier, and completely consistent flow rate... but you as a DIYer won't need to worry about that. I should also mention there are some caulking guns that are even powered by corded mains power, and even pneumatic (air pressure) systems. If you insist on going down this route, I recommend using whatever brand/battery system you already have with you drill. The last thing you want is your cord being smeared through your just installed silicone sealant. (Ask me how I know). Honestly, I use the most basic gun most of the time, and your skill with cleaning your work up is more important than the gun itself.
What do you use these for?
Ever had mould build up in the corners of a bathroom or kitchen? Or has the silicone "let go" and has it gone a disgusting black when it should be white or clear in places?... then you need to remove all the old silicone, clean out the mould, let it dry completely, then reapply the sealant.
Worried that you don't have enough glue on a large-area glue up of differing materials? A caulking gun is the go-to tool for most construction workers. Although please note that glues such as "liquid nails" do have their limitations too. Read the instructions so you know what you're doing.
So what have I used it for?
Mostly DIY renovations, such as installing sheet stock (Gyprock/plasterboard/etc) filling in gaps, siliconing (sealing) joints in wet areas like laundries, bathrooms and kitchens.... but when you get serious, you can use large amounts of adhesive for wood working, (especially veneering) creating water-tight, air-tight or sound proof enclosures, basically wherever something sticky and rubbery is needed.

Rotary Tools
Rotary tools (or if you prefer brand names, Dremel) are basically small, high speed motors that are ideal for small/detailed work. That said, rotary tools also include larger sized "Die grinders" which are more of a metal working, industrial tool... however, I'm going to stick with the "Dremel" style ones here.
Don't let their size fool you, they can do a huge variety of things. They can grind rocks and concrete, sharpen and cut metal with miniature angle grinder wheels, they can sand with tiny drum sanding accessories. They can polish metals and strip paint from tight spaces with tiny wire wheels, or even do small routing jobs with you guessed it, tiny router bits. This is, of course, on top of engraving too.
I've used mine for everything from engraving, cutting machine screws to length, cutting nails flush with wood, shaped and polished rocks, sanding all manner of work, cleaned off rusty parts, and even routed small adjustment slots into the wood soap cutter I've build for my better half. Small scale wood carvers, electronics enthusiasts, jewellers, and the model-building crowd are probably the most devoted rotary tool users I can think of.
There are a thousand different attachments you can get. Some add a stylus grip on a flexible attachment. Some are right-angle attachments, some make a rotary tool work like a drill press and another, a router. Some accessories clamp the rotary tool to the desk for a tiny bench grinding setup. I'm sure there are others I'm only dimly aware of.
Some important notes:
Surprisingly, it's usually better value to buy larger kits than single parts, even if they have some parts you'll never use.
Unsurprisingly, the tiny size of the accessories means that most accessories aren't built to last, or are consumable, and get consumed rapidly with heavy use. Please keep this in mind.

A "laminate" or "trim" router...
Routers are amazingly versatile tools. However, they're a tool that really needs to be treated with care, so watch a few router safety videos and practice on some scrap wood before working on any important projects.
This is actually a smaller "trim" or "laminate" or "palm" router model that I have owned for years and came in a versatile kit with both a fixed and plunge base. I heartily recommend it (or the modern day equivalent). But don't get too hung up on brands. However, the stuff you're looking for should include:
- Variable speed.
- A "plunge base" at the very least, (since it's the more versatile base) or both plunge and fixed base included.
- Soft start (slowly accelerates on power up)
- Comfortable grip and operation.
- Ideally, corded (not cordless) since the power requirements are quite taxing on a battery.
If you buy the smaller trim/laminate/palm router, you'll need router bits with 1/4" shafts. If you buy a larger model, you'll probably need bits with a 1/2" shaft/shank. Make sure you're buying the right set.
For more information, have a look at my dedicated router page, found here:
https://waywardham.net/index.php/woodworking/talking-tools-routers

The oscillating multi-tool
If there's a better flush cutting power tool, I've yet to find it... and those flush cuts can even trim heavy duty nails and bolts if you have higher quality blades.
While it can do sanding with the right attachments... I don't like doing it with the multi tool for anything but the smallest/finest tasks.. and even then, I'd prefer to do that sort of finer work by hand.
As I mentioned, it's my go to for drywall/Gyprock cutting, but it's also the first thing I use to trim up a hole so I can cut a simple square/rectangular replacement "patch" part to fill the hole.
Like the Dremel, good parts are often cheaper in bulk kit form, but don't be surprised if your tool costs $400, and a good diamond encrusted blade costs $107 by itself. Sure, experiment with cheaper, off-brand blades (some are good.. others... not so much).. but for time-critical work... use the good stuff.